

How to Set Up Tip-Ups for Pike: Rigging, Depth and Spread
This isn’t about choosing between tip-ups, jigging, or deadsticking—that decision is covered in our Ice Fishing for Pike guide. If you’re here, you’ve already made that call. This guide answers the next question: how to set up tip-ups for pike, including the rig itself, how deep to run the bait, and where to place each tip-up in your spread.
We’ve run tip-up spreads for pike across multiple seasons and different types of water. The setup below is based on what has consistently worked in those conditions, including what we change when flags stop coming. Where the evidence and angler experience are genuinely divided—such as wire versus fluorocarbon or a single hook versus a quick-strike rig—we’ll explain the tradeoffs instead of pretending there is one correct answer for every situation.
Quick Answer: How to Set Up Tip-Ups for Pike
Our standard pike tip-up starts with 30–50 lb tip-up line connected to a barrel swivel, followed by an 18–24 inch bite-resistant wire or heavy fluorocarbon leader and either a single hook or a quick-strike rig where local regulations allow it. Add a small split shot or sliding sinker above the leader—only enough to keep the bait at the intended depth and limit excessive movement without making the presentation feel unnaturally heavy.
As a starting point, suspend the bait roughly 1–3 feet above the bottom or just above the highest vegetation, then adjust according to the depth, cover, electronics, and where pike are actually moving. For the spread, place one tip-up shallow, one along a weed edge or break, and another slightly deeper. Once one zone produces repeated flags, move the unproductive tip-ups toward that depth and structure instead of leaving the original spread in place all day.
What a Tip-Up Actually Does—and Doesn’t
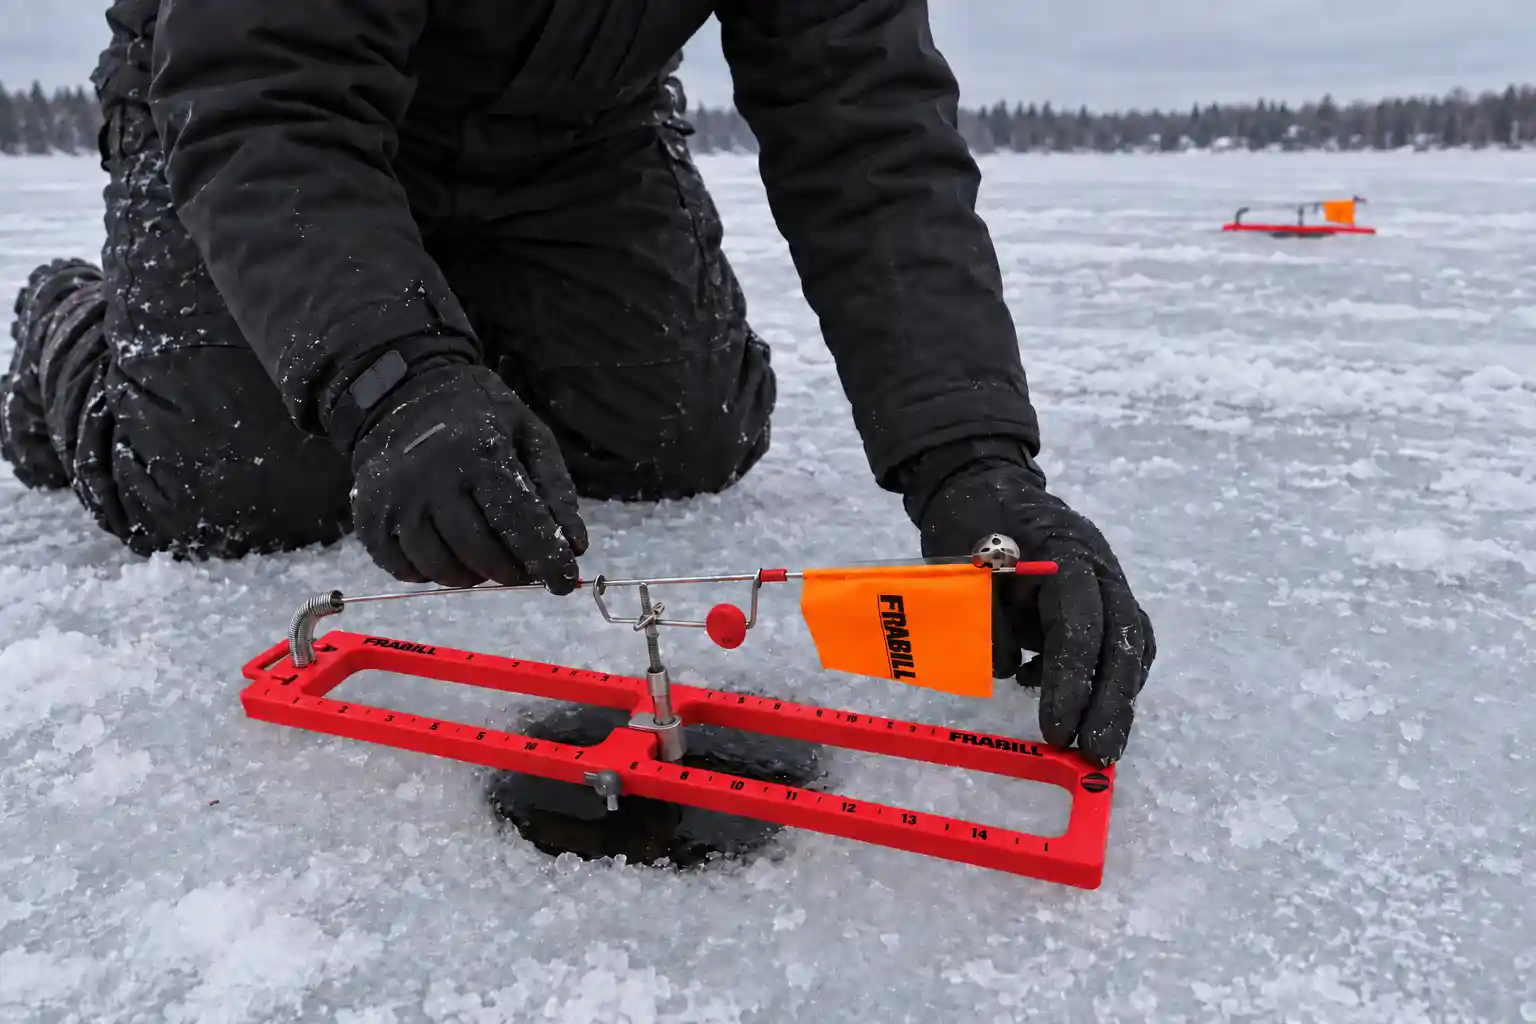
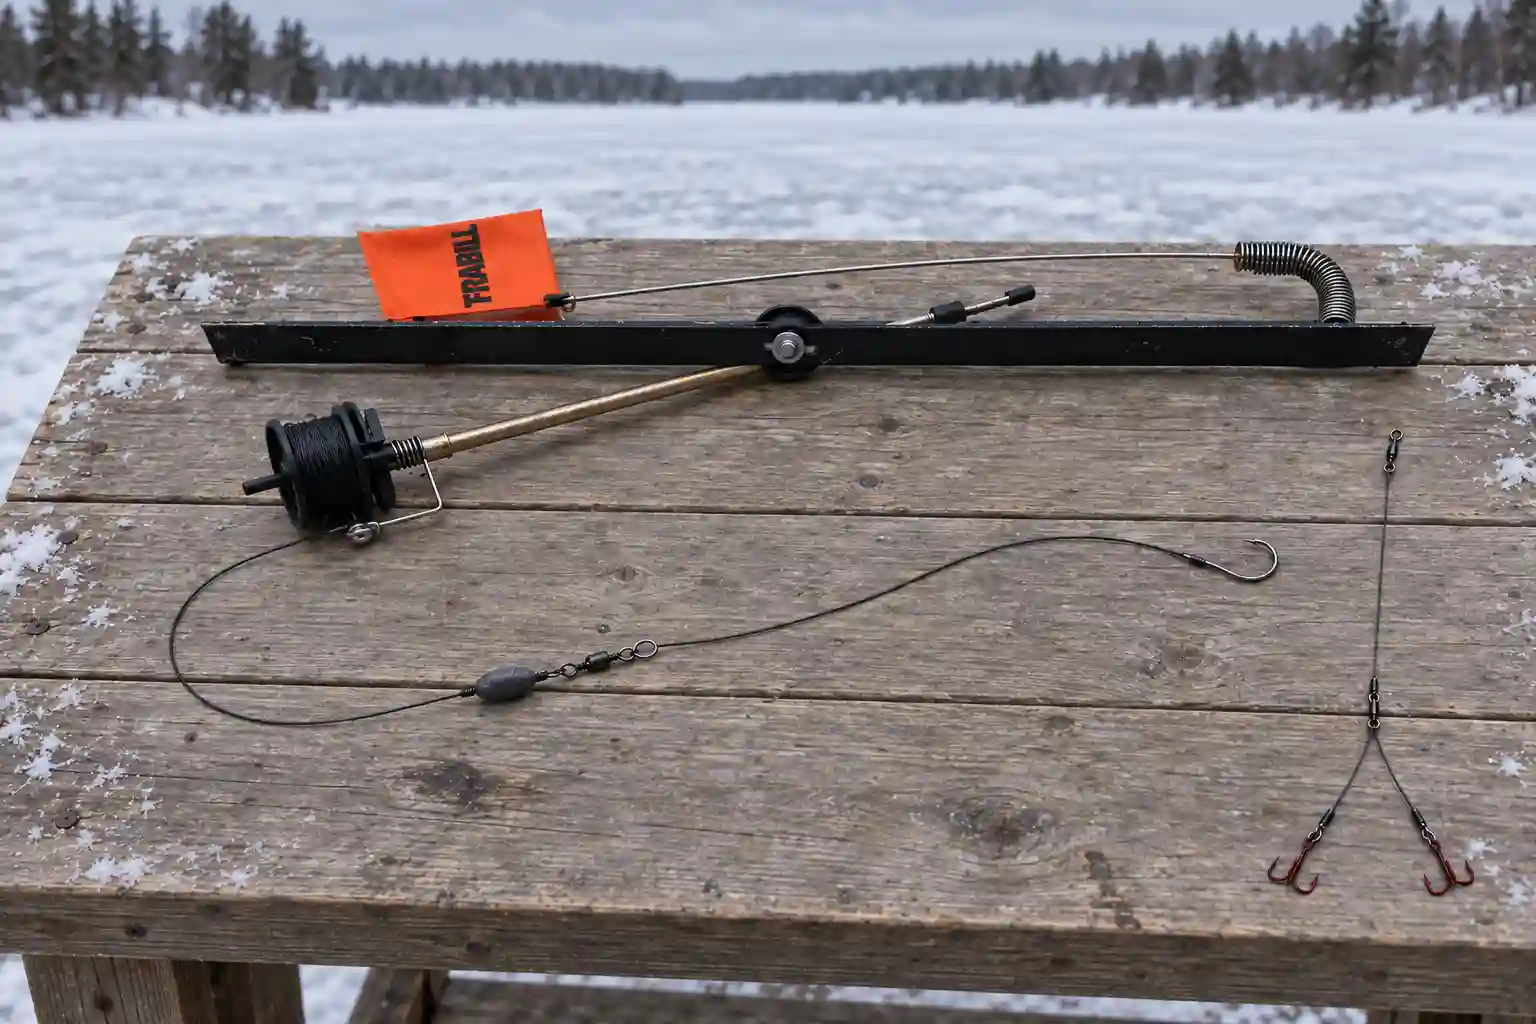
When we set a standard tip-up, the bait stays at the depth we’ve chosen while the spool sits below the surface, where it is less likely to freeze. If a pike takes the bait and moves, the line turns the spool, releases the trip mechanism, and sends the flag upright. That simple system lets us cover several legal lines across different depths and pieces of structure while we watch the entire spread instead of staying over one hole with a jigging rod.
One thing we’ve learned is that a raised flag does not automatically mean a hooked pike. The tip-up cannot tell us which fish moved the bait, whether the hook is inside its mouth, or whether the fish is still there. Wind, a trip setting that is too light, or a large active baitfish can also release the flag. That is why we treat the flag as an alert, not confirmation—we approach the hole, look at the spool, and check the line movement before deciding what to do next.
Conventional tip-ups also do not set the hook; automatic hook-setting devices work differently and may be regulated separately. If you are still choosing a pike tip-up, we have compared the models that best fit this type of setup.
How to Rig a Tip-Up for Pike, Step by Step
When we rig a pike tip-up, we build it in the same order every time: main line, weight, swivel, bite-resistant leader, and hook system. Keeping that order consistent makes it easier for us to inspect the rig, replace a damaged section, and reset everything correctly when our hands are cold.
1. Spool the Tip-Up With Main Line
We start with 30–50 lb braided Dacron tip-up line. This is the line we handle directly while fighting the fish, so we want a thick diameter that is easy to grip and strong enough for pulling a heavy pike toward the hole. We call it the main line rather than backing because it remains part of the working rig from the spool to the leader.
2. Add the Weight
Next, we slide a small sinker onto the main line before tying on the swivel, allowing the weight to rest immediately above the swivel once the rig is lowered. A split shot can be fixed in the same area instead. We use only enough weight to bring the bait to the chosen depth and limit how far a lively bait can move out of the target zone. The required weight changes with bait size, depth, and current, so we do not treat one sinker size as correct for every hole.
3. Connect the Swivel
We tie the main line to a barrel swivel, which creates a clean connection for the leader and helps manage line twist. When we want to change pre-tied leaders quickly, we use a properly rated snap swivel instead. That lets us replace a damaged leader or change hook systems without tying a new connection over an open hole with cold hands.
4. Attach a Bite-Resistant Leader
Our starting point is an 18–24 inch wire or heavy fluorocarbon leader, although the exact length can change with bait size and the hook system we are using. We inspect the full leader after every fish because it is the only section protecting the main line from a pike’s teeth. If we find a kink, abrasion, damaged crimp, or weakened knot, we replace it rather than risk the next fish. Wire and fluorocarbon behave differently, which we compare in the next section.
5. Finish With the Hook System
At the end of the leader, we attach either a single hook or a quick-strike rig, depending on the bait, the presentation, and what local regulations permit. We check those rules before building the rigs because permitted hook numbers, configurations, and bait use can vary between jurisdictions and individual waters.
6. Measure and Mark the Depth
Before baiting the hook, we clip a sounder to it and lower the rig until the sounder reaches bottom. With the line held tight, we mark the bottom depth using a sliding button or Dacron bobber stop, then raise the bait to the height we want. That marker gives us a repeatable reference, so after rebaiting or resetting a flag, we can return the bait to the same depth without measuring the hole again.
Wire vs. Fluorocarbon Leaders for Pike Tip-Ups
We get asked about this more than almost anything else in a tip-up rig, and the honest answer is that both materials work—we run each depending on the conditions, not out of habit.
Wire is what we reach for when the water is stained, when we’re using larger dead bait, or whenever maximum bite protection matters more than keeping the leader less visible. A sound wire leader gives us better protection from direct tooth contact than fluorocarbon, but that does not make the entire rig failure-proof. We still inspect it for kinks and check the crimps, knots, snaps, and swivels because those connections can become the weak point. Some wire leaders are also stiffer than others and can restrict how naturally a lively bait moves.
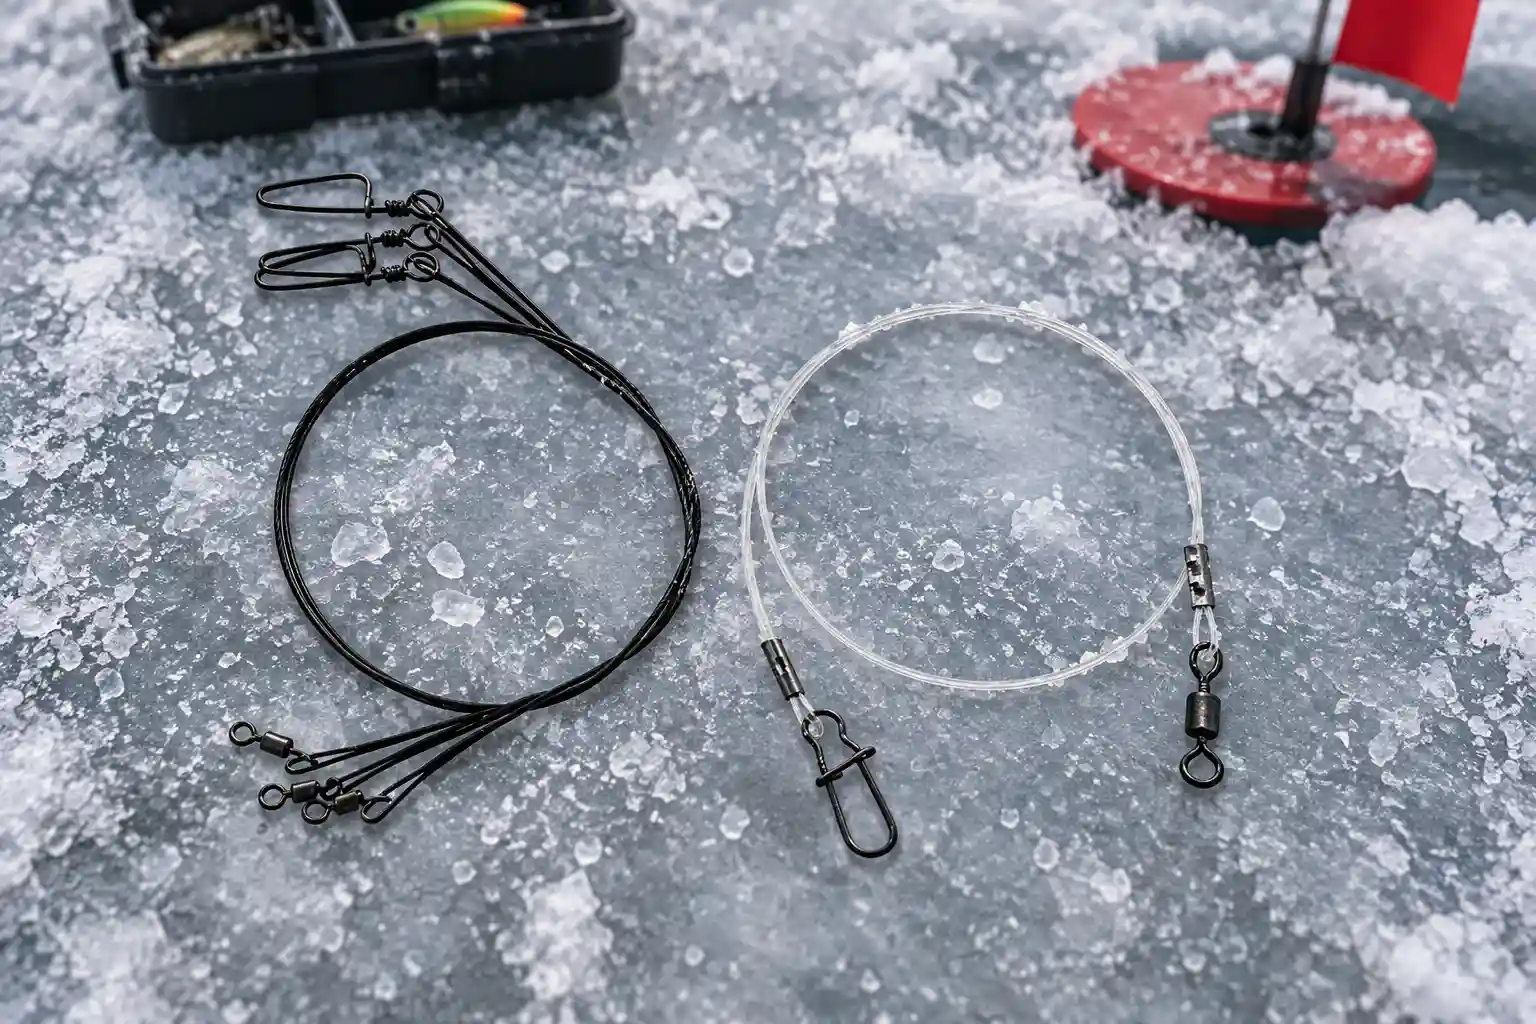
Heavy fluorocarbon earns its place in clear water and when presentation matters more. It provides a less visible connection, but it does not offer the same protection from direct tooth contact as wire. A large pike can still damage or part fluorocarbon when the leader runs across its jaw, and we’ve had that happen. That is why we never treat fluorocarbon as bite-proof, regardless of its breaking strength, and inspect the section nearest the hook after every fish for roughness, flattening, or cuts.
Neither material is the correct answer for every hole. When we are unsure which one the fish will tolerate, we sometimes run both within the same attended spread and compare them under the same conditions. Wire stays on the lines where bite protection is the priority, while heavy fluorocarbon gives us a second presentation to test. Our complete pike fishing leader breakdown covers material strength, diameter, visibility, connections, and leader selection in more detail.
Single Hook vs. Quick-Strike Rig for Pike
This is one part of the setup where we will not pretend there is a single correct answer. We have used both systems successfully, and the better choice depends on the bait, how quickly we can respond to a flag, and what the local regulations allow.
A single hook is the simpler system. We match its size to the bait rather than relying on one hook size for every setup. With live bait, the hook can be placed carefully beneath the dorsal fin or through the lips, depending on how we want the bait to move and remain oriented. A single hook is quick to rig and leaves less hardware attached to the bait, but it should not be treated as a reason to let a pike swim away for an extended period. Waiting for the fish to swallow the bait increases the risk of a deep hook, especially when using traditional J-style hooks.
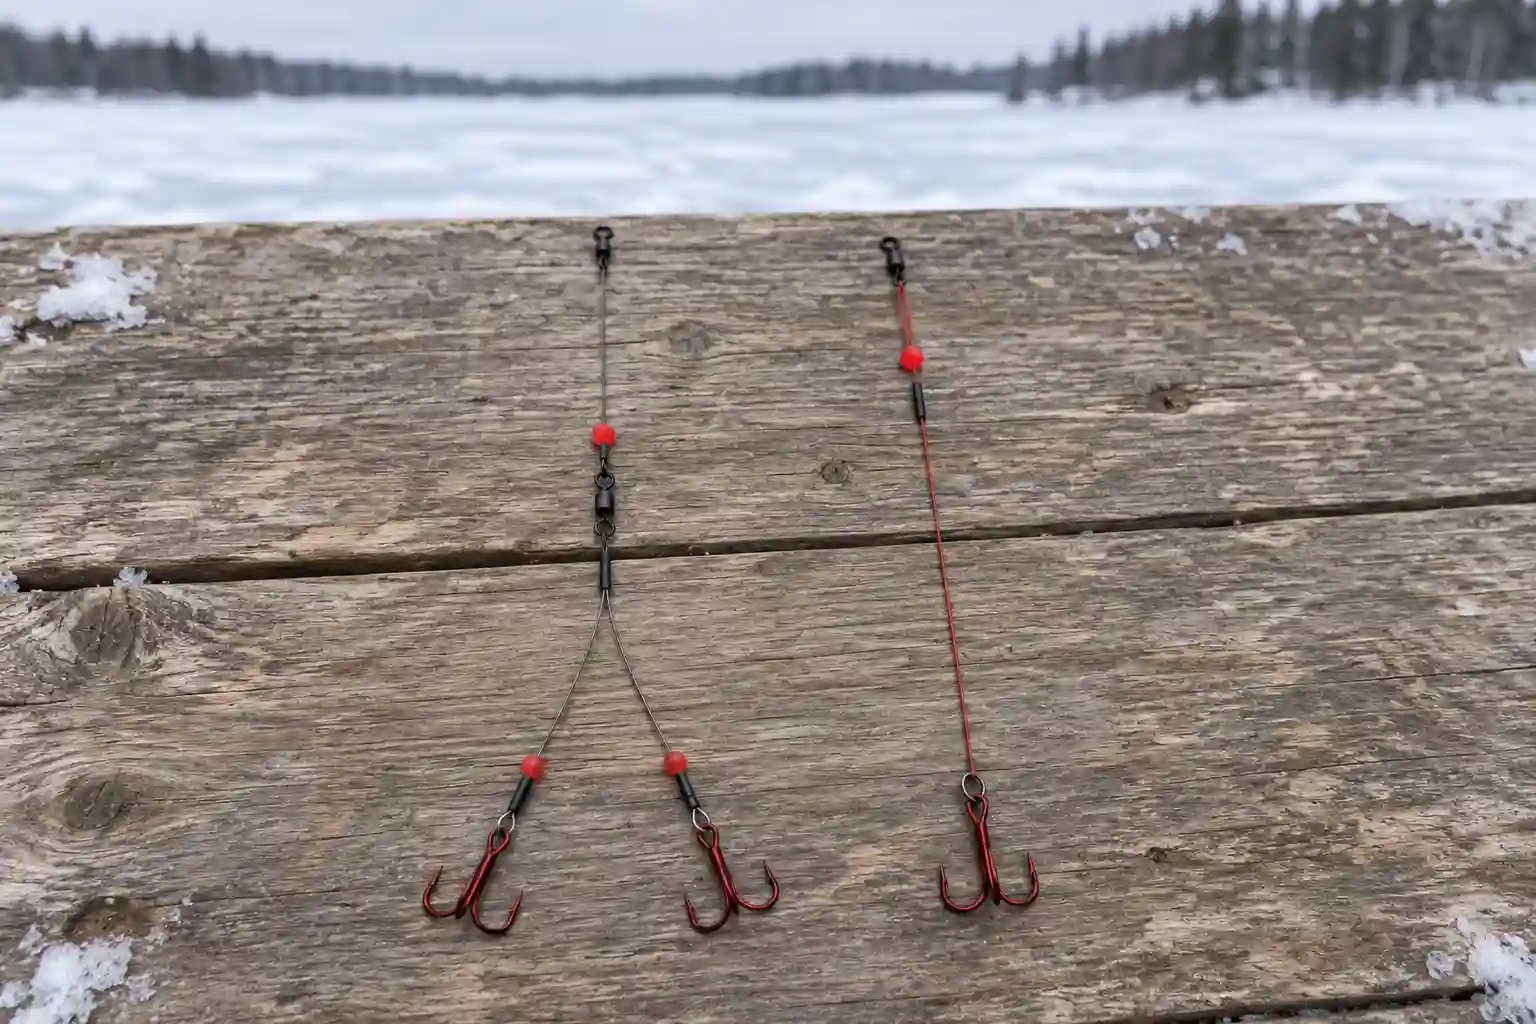
A quick-strike rig uses two hooks positioned along one bait, commonly with one near the head and the other closer to the tail or dorsal area. This gives us more than one potential hook position and allows a prompt hookset without deliberately waiting for the pike to swallow the bait. We still make sure the fish is moving with the bait before setting rather than reacting blindly to every raised flag. The tradeoff is additional hardware: a poorly spaced rig can hang the bait unnaturally, become tangled while being lowered, or place a hook outside the mouth during the strike.
Quick-strike rigs are often promoted as the safer catch-and-release choice because they allow an earlier hookset. Minnesota expanded its permitted multiple-hook configuration to a maximum of 18 inches partly because the DNR expects earlier hooksets to reduce swallowed and deeply set hooks. However, that does not mean quick-strike rigs cause fewer injuries in every situation. Recent field research found higher catch success with multiple-hook quick-strike rigs, but also more foul hooking and longer unhooking times than with single-hook rigs.
We therefore treat hook placement, prompt response, and careful unhooking as equally important as the rig itself. Because the additional hook points can make removal more involved, we keep long-reach pike fishing pliers within reach before the first flag goes up.
In our spread, we choose the hook system before setting the bait and keep every active tip-up attended. We use a quick-strike rig when it is legal, suits the bait, and allows us to respond promptly. We use a single hook when local rules or the presentation call for a simpler setup, but we do not compensate by giving the fish unlimited time to swallow the bait. Before building either system, we check the permitted number and type of hooks, maximum rig length, bait rules, and any water-specific restrictions.
How High to Set the Bait
We do not run one universal bait depth across the entire spread because the correct height changes with what is beneath each hole. Instead, we use the bottom, the top of the vegetation, and any suspended fish or bait we can see on an ice fishing fish finder as reference points. We then stagger the tip-ups rather than placing every bait at exactly the same height.
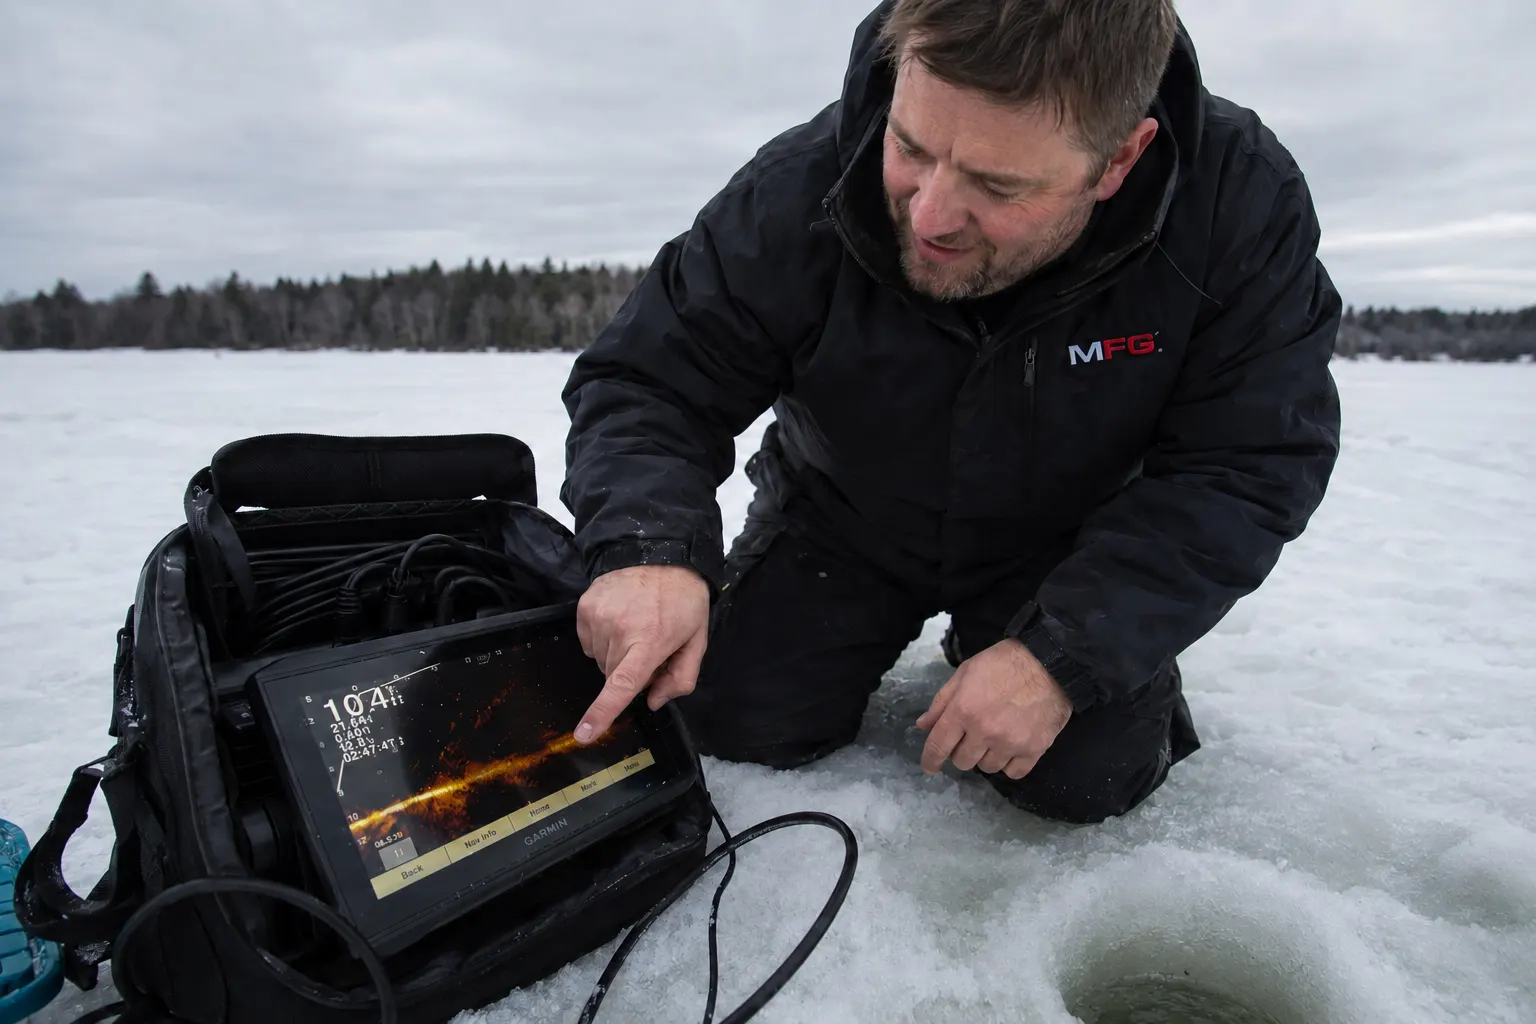
Over weeds, we keep the bait above the highest growth rather than burying it in the canopy. A bait dropped into cabbage or coontail can foul, disappear inside the cover, or become difficult to monitor. We first identify the top of the vegetation with electronics, an underwater fishing camera, or the resistance felt with a sounder, then begin roughly a foot above it. If the weeds rise or fall across the spread, we reset each tip-up for the cover directly beneath that hole instead of copying one depth across all of them.
Over open bottom or along a break, we start approximately 1–3 feet above bottom and test more than one height. We might keep one bait close to the bottom while raising another farther into the water column. Pike can readily attack prey above them, so when we are uncertain, we would rather begin slightly high than place the bait below a cruising fish’s level. If electronics show pike holding higher, we move the bait toward them instead of leaving every rig near bottom out of habit.
Over deeper basin water, we stop using the bottom as our only reference. If electronics show suspended pike or forage, we place the bait at that depth or slightly above it. If the screen shows no suspended activity, we keep at least one bait closer to the lower part of the water column while using the other tip-ups to test progressively higher levels. Deep water alone is not a reason to suspend every bait halfway down.
Once one height produces repeated flags, we move nearby tip-ups toward the same level while keeping at least one bait above or below it as a control. That prevents us from rebuilding the entire spread around a single flag, but still lets the fish narrow the productive depth for us.
How to Build a Tip-Up Spread
A spread is not a group of tip-ups scattered wherever we find open ice. We treat it as a set of test points designed to answer one question quickly: where are the pike moving right now? The layout depends more on the structure beneath us and the number of lines we are legally allowed to use than on any fixed distance between holes.
Running a line across a depth transition is our default on a break or drop-off. We place the tip-ups perpendicular to the contour—shallow, mid-depth, and deep—so each bait covers a different depth. This increases the chance that a pike moving across or along the transition encounters at least one presentation. It is the pattern we use most often early in a session, before the first flags give us reliable information about the productive depth.
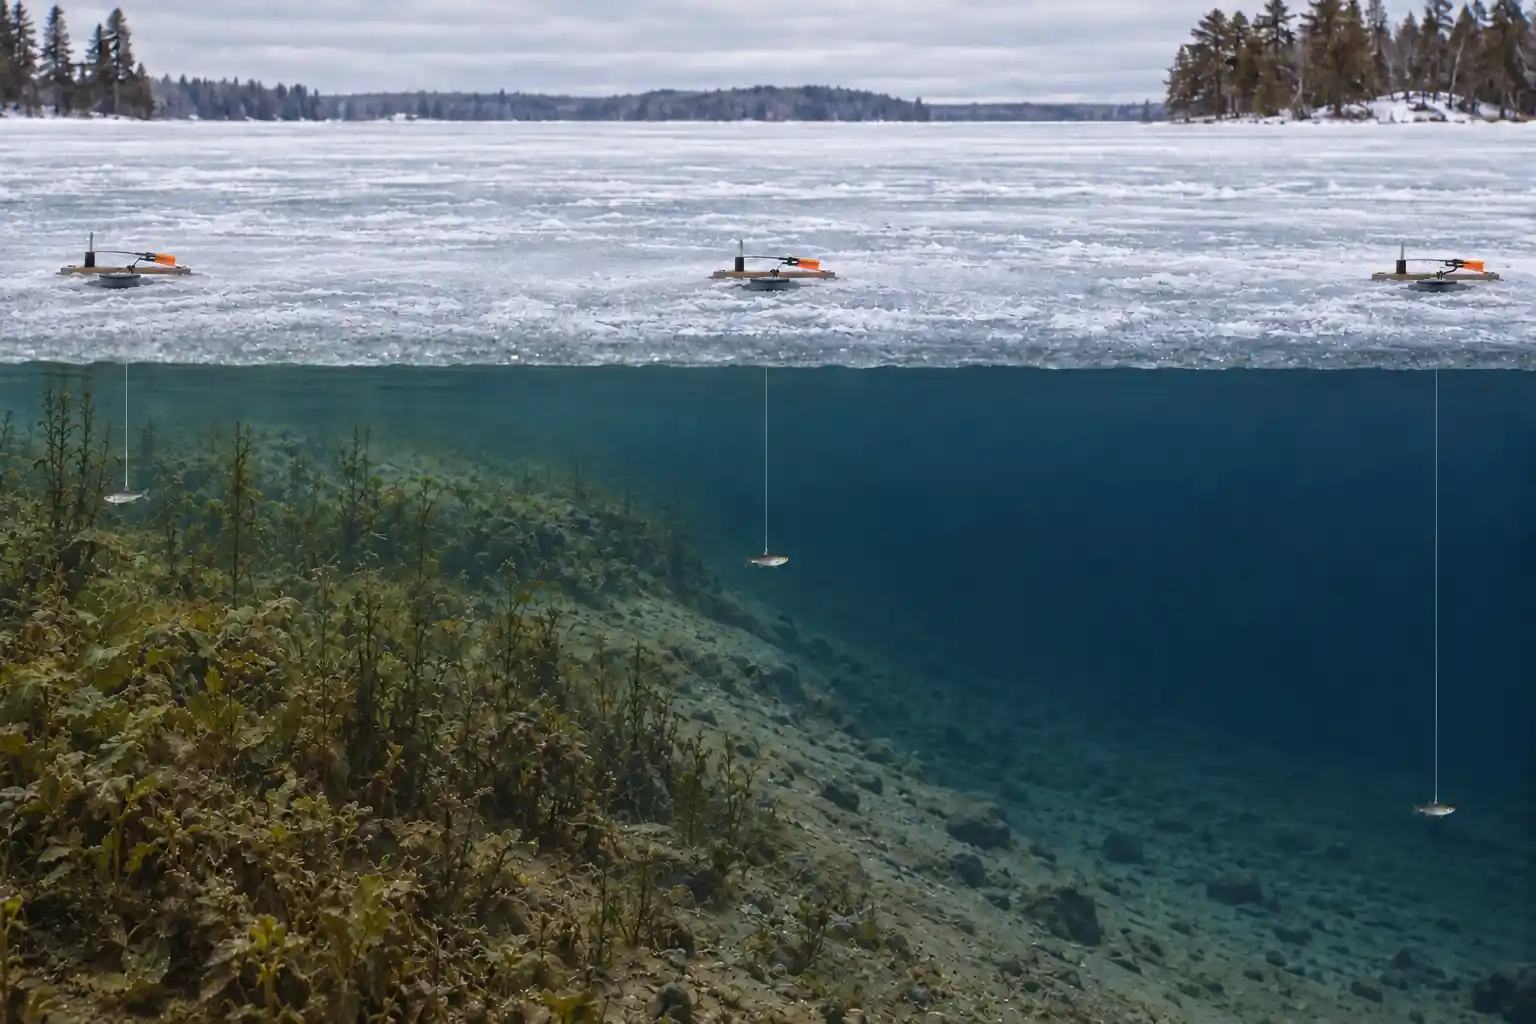
Along an irregular weed edge, we use a staggered or zig-zag pattern instead of forcing the spread into a straight line. Cabbage and coontail edges rarely follow a perfect contour, so we position holes around the points, pockets, and inside turns we can identify. Those irregularities are where we have seen pike pause or travel close to cover, so we would rather follow the actual weed line than place evenly spaced tip-ups across less promising open stretches.
We cluster tip-ups around a specific feature only when we already have a reason to believe it is holding fish. That may be a point, bay mouth, sharp inside turn, repeated flags, an electronics reading, or a productive location from an earlier trip. In that situation, we are less concerned with searching several unrelated depth zones and more interested in testing the feature from different sides and at different bait heights.
We do not use one fixed spacing rule for every lake. The distance between tip-ups changes with the number of legal lines, the size and shape of the structure, visibility across the ice, and any local requirement governing how closely the devices must be attended. A short weed edge does not need the same spacing as a large main-lake point dropping toward the basin. We would rather fish a tighter spread that we can monitor properly than stretch it across an arbitrary distance and react late to the outer flags.
If we have three legal lines and no established pattern, our first set is simple: one bait shallow, one along the outside weed edge or top of the break, and one slightly deeper. When two flags come from the same depth or section of structure, we move one unproductive tip-up toward that zone while leaving another outside it as a control. That lets us tighten the spread around a developing pattern without rebuilding everything around a single flag.
How to Set the Trip Tension
Trip tension is one adjustment we do not set once and ignore. If the release is too light, wind or a large active bait can trigger false flags. If it is too heavy, a pike may struggle to release the flag or feel enough resistance to drop the bait. We adjust it according to the bait, weather, current, and the mechanism on the tip-up we are actually using.
We start with lighter tension for smaller baits and calm conditions. A modest minnow does not pull with the same force as a large sucker, so it does not need the same resistance at the trip. On models with separate light and heavy positions, we begin with the lighter setting. On tip-ups that use smooth and notched sides, adjustable shaft height, or a change in flag-wire angle, we follow the model’s mechanism rather than assuming every shallow notch means the same thing.
We increase the tension for larger, more active baits, current, or repeated false flags in windy conditions. A large sucker or chub can release an overly sensitive flag through normal movement, and gusts can push against the flag wire or trip mechanism. We’ve reset more than one false flag on a windy afternoon, but we increase the resistance only enough to keep the bait and weather from tripping it. The setting still needs to release cleanly when a pike moves with the bait.
Orientation in the wind depends on the tip-up design. Some models let us position the flag wire against a smooth or notched side of the trip shaft, while others use a dedicated wind bar, adjustable shaft, or separate sensitivity setting. Before lowering the bait, we trigger the mechanism by hand from the direction the spool will rotate and confirm that it releases cleanly. On a gusty day, we also position the tip-up so the prevailing wind is not pushing the flag wire off the trip by itself.
We treat false flags and unexplained missed activity as reasons to test the mechanism, not immediately blame the fish. If one hole repeatedly trips without a fish, we increase the resistance one step and watch what happens. If the bait shows signs of being moved but the flag is not releasing, we inspect the spool for ice or friction and try a lighter setting. We change one variable at a time so we know whether the adjustment actually fixed the problem.
What the Spool Tells You After the Flag
The flag only tells us that something moved the bait. What we do next depends largely on what the spool is doing when we arrive, not on the flag itself. We approach promptly but under control, then watch the spool before touching the tip-up.
A spool that has already stopped when we arrive most often means one of two things in our experience: a false trip from wind or an overly light setting, or a fish that grabbed the bait, moved, and then stopped or dropped it. We watch for several seconds before assuming nothing is there because a pike may still be holding the bait or moving toward the hole. If the rig comes back without a fish, we inspect the bait before resetting it. A chewed or missing bait tells us a fish made contact, and we usually give that same spot another chance rather than moving the hole immediately.
A spool turning slowly and steadily is a pattern we usually read as a fish moving away with the bait at a controlled pace. With a single-hook rig, we may give it a brief moment to keep moving rather than pulling immediately, but we do not wait long enough for the fish to swallow the bait. With a quick-strike rig, we take up the slack, confirm the fish’s weight, and set promptly.
A spool spinning fast, stopping, and then starting again often means the fish is changing direction, pausing, or repositioning the bait. We do not treat the pattern as proof of one exact behavior, but it tells us the fish may still be active on the rig even while the spool is momentarily still. With a quick-strike rig, once the line moves again and we confirm weight, we are more willing to set rather than wait for another long, steady run.
Before setting the hook, we take the line by hand and feel for weight or movement rather than setting blindly from the spool alone. Steady resistance tells us the fish is still connected. If the line feels slack, we gather it smoothly instead of assuming the fish has gone, because a pike may be moving toward the hole. Once we feel its weight, we commit to the hookset.
The spool does not tell us everything happening below the ice, but over time these patterns have become useful clues. We use them to judge how quickly to take control of the line while still letting the rig type and the weight of the fish guide the final decision.
No Flags? Move the Spread, Not Just the Bait
If we’ve decided to stay with tip-ups, we work through a quiet spread in a specific order. We first confirm that the baits are still positioned correctly, the hooks are clear of weeds, the holes have not frozen around the line, and each spool and trip mechanism can move freely. There is no point changing the entire spread because one rig stopped working properly.
We give a promising location a fair amount of time before moving it. If the spread covers a weed edge, break, or travel route that we trust, an hour without a flag is not automatically enough to abandon it. Pike can move through in short feeding windows at any point during the day. On unfamiliar water with no fish, bait, or useful structure showing on electronics, however, we move sooner rather than waiting two hours simply because the clock has not run out.
If the rigs are working and the location still looks right, bait height is the first variable we test. We raise or lower one or two baits to cover another part of the water column while leaving at least one at the original depth as a control. That gives us new information without drilling another set of holes or changing every presentation at once.
If the depth changes produce nothing, we relocate holes instead of repeatedly adjusting an unproductive spread. We move to a different weed edge, point, inside turn, or a meaningfully different depth range—not just a few yards across featureless water. A spread that is not intersecting moving pike will not improve simply because we keep changing bait height above the same structure.
Once we relocate, we return to the same simple starting spread: one bait shallow, one along the edge or top of the break, and one slightly deeper. We give the new area a fair test before tightening the spread around any repeated flags.
Changing bait type comes later in our process. We always replace a damaged, dead, fouled, or poorly presented bait immediately, but we do not start cycling through different species and sizes just because the flags have been quiet. Once we are confident that the spread is covering productive water at useful depths, changing bait size, species, or presentation becomes a meaningful test rather than a frustrated guess. When dead bait is part of that test, our breakdown of the best winter deadbaits for pike explains which options we use and what each one brings to the presentation.
Tip-Up Rules to Check Before Fishing
Everything in this guide—rig construction, hook choice, and spread size—has to fit the regulations for the water we’re fishing. Those rules vary between states, provinces, and sometimes individual bodies of water, so there is no single standard we can apply everywhere. We check them before building the spread, not after reaching the ice.
Number of lines. How many tip-ups we can legally run at once is usually the first number that shapes the spread. Some jurisdictions count every rod, handline, and tip-up toward one combined limit, while others regulate ice-fishing devices differently. We confirm the total allowed per angler rather than assuming every tip-up has its own separate allowance.
Hook systems. Whether a multiple-hook quick-strike rig is legal—and, where applicable, how many hooks it may carry or how large the complete configuration may be—can differ by jurisdiction, species, or body of water. We confirm this before tying rigs at home rather than discovering at the hole that the setup is not permitted.
Tip-up identification. Some jurisdictions require each tip-up to display the angler’s name, address, license number, or another identifying mark. It is an easy requirement to miss when crossing into a state or province with different rules, so we check both the fishing regulations and any water-specific provisions.
Attendance and distance requirements. Depending on the jurisdiction, tip-ups may need to remain under our immediate control, within sight, continuously attended, or inside a specified maximum distance. That affects how widely we can spread them and whether we can leave the area to check another location or warm up. We build the spread around the actual attendance rule instead of assuming that seeing a distant flag is enough.
Live bait restrictions. Regulations may restrict which baitfish species we can use, where bait may be collected or purchased, whether it may be transported between waters, and whether live bait is permitted at all. These rules are especially important where invasive species or fish-disease controls are in place, and they can vary between waters within the same jurisdiction.
Regulations can change from one season or body of water to another, and a setup that is legal across a state or provincial border may not be legal where we are fishing. Before setting a tip-up, we confirm the current statewide or provincial regulations and then check for any additional rules covering that specific water.
FAQ: Setting Up Tip-Ups for Pike
How do you set up a tip-up for pike?
Spool the tip-up with 30–50 lb tip-up line, add a sliding sinker or split shot, tie on a swivel, attach an 18–24 inch wire or heavy fluorocarbon leader, and finish with a single hook or a legal quick-strike rig. Use a depth sounder and mark the line before baiting so you can return the presentation to the same height after every reset.
What’s the best leader for pike tip-ups—wire or fluorocarbon?
Neither is right for every hole. Wire gives us more dependable protection against a pike’s teeth and is our preferred option for longer dead-bait soaks. We use heavy fluorocarbon when lower visibility and freer bait movement matter more, but a large pike can still fray or part it. We inspect fluorocarbon after every fish and replace it whenever we find damage.
Is a single hook or quick-strike rig better for pike?
Both can catch pike consistently. A single hook is simpler and places less hardware on a live bait, but we don’t deliberately wait for a pike to swallow it because a delayed hookset increases the risk of deep hooking. A quick-strike rig is designed for a prompt hookset once we confirm the fish is moving with the bait. Research on ice-angled pike found higher catch success with some multi-hook quick-strike configurations, but also more foul hooking and longer dehooking times, while deep-hooking events were infrequent overall. Check local regulations before choosing either system.
How deep should you set the bait on a pike tip-up?
There’s no single depth that works over every type of structure. Over weeds, we keep the bait just above the highest growth. Over open bottom, we usually start 1–3 feet up and adjust from there. In deep basin water, we use electronics to match the depth of suspended fish or baitfish rather than automatically placing every bait near the bottom.
How many tip-ups can you legally run for pike?
It depends entirely on where you’re fishing. Some states and provinces apply one combined limit to tip-ups, rods, and other lines, while others regulate ice-fishing devices differently. Confirm the current regulations for the specific body of water before building your spread.
How far apart should tip-ups be spread for pike?
We base spacing on the structure, visibility across the ice, attendance requirements, and the number of lines we’re allowed to run—not on one fixed distance. A short weed edge calls for a tighter spread than a large main-lake point dropping toward open basin. Each tip-up should be far enough from the next to test a different depth or part of the structure while remaining close enough to monitor and reach legally.
What does it mean when a tip-up flag goes up but nothing’s on the line?
In our experience, common causes include wind, an overly sensitive trip setting, an active baitfish, or a fish that took the bait and then stopped or released it. We check the bait and rig before resetting. Tooth marks, damaged bait, or a missing bait confirm that something contacted the presentation, but it doesn’t prove that it was a pike. Unless false flags keep repeating, we usually give the same hole another chance.