

Ice Fishing Safety: How Thick Should the Ice Be?
Ice fishing safety comes down to one uncomfortable truth: there is no such thing as 100% safe ice. Every guideline in this article—every thickness, color, and warning sign—is meant to help you make a more informed decision, not promise a safe outcome. If you’re looking for how pike behave and where to fish once conditions allow you to head out, our ice fishing for pike guide covers that. This article focuses on the question that must come first: what should you check before trusting the ice beneath you?
At Master Fishing Guide, we treat every published thickness chart as a minimum guideline, not a guarantee. Based on our collective experience on frozen lakes, our own rule is to look for at least one additional inch (2.5 cm) of good-quality, clear ice beyond the applicable minimum before stepping onto a new location or pulling gear onto it. That extra margin is our personal safety threshold—not an official standard—and it never replaces checking ice quality, measuring repeatedly as we move, watching recent weather, or turning back when conditions are uncertain.
Ice Thickness Chart by Activity
Ice-thickness recommendations are not universal, and local agencies may publish different numbers or discourage certain activities entirely. The table below follows the Minnesota DNR’s general guidelines, which apply only to new, clear ice.
Use these figures as minimum reference points—not guarantees. Always check the current guidance for the state, province, and body of water where you plan to fish.
| Activity | Minimum Thickness | Important Context |
|---|---|---|
| Walking or ice fishing on foot | 4 in (10 cm) | For new, clear ice only; remain off ice measuring less than 4 inches |
| Snowmobile or small ATV | 5–7 in (13–18 cm) | Vehicle weight and local regulations still apply |
| Side-by-side ATV | 7–8 in (18–20 cm) | Check the actual machine weight and local guidance before traveling |
| Small car or SUV | 9–10 in (23–25 cm) | Some jurisdictions discourage or prohibit vehicle travel on ice |
| Medium SUV or small truck | 11–12 in (28–30 cm) | Thickness at one hole does not confirm the entire travel route |
| Medium truck | 13 in (33 cm) | Vehicle travel introduces substantially greater load and risk |
| Heavy-duty truck | 16–17 in (41–43 cm) | Do not rely on a general chart without current local verification |
| Heavy-duty truck with a wheelhouse | 20+ in (51+ cm) | Total loaded weight matters, not only the listed vehicle type |
These figures apply only to new, clear ice—not white or snow ice, thaw-weakened ice, or ice affected by current. Ice rarely freezes uniformly, so a qualifying measurement near shore does not confirm conditions farther out.
We prefer additional margin beyond any published minimum. However, no extra inch can replace checking ice quality, measuring repeatedly along the route, carrying proper safety equipment, and turning back when conditions are uncertain.
The general chart above should not automatically be applied to a load that remains in one place for hours. The Minnesota DNR publishes separate guidance for stationary or parked loads that remain in place for more than two hours but less than seven days.
That guidance lists 6 inches of effective ice thickness for one person standing, compared with the general 4-inch guideline for ice fishing or other activity on foot. This distinction matters to pike anglers who set up a shelter and remain over the same area for much of the day.
The total load also includes the shelter, sled, auger, heater, electronics, and other equipment—not only the angler. Treat the stationary-load table as an additional planning reference, verify local guidance, and never assume that one qualifying measurement represents the entire fishing area.
Why Ice Color and Quality Matter Alongside Thickness
Two lakes—or two spots on the same lake—can show the same thickness reading and support very different loads. Thickness alone doesn’t reveal how the ice formed, whether it contains trapped air or water, or how much it has deteriorated since forming.
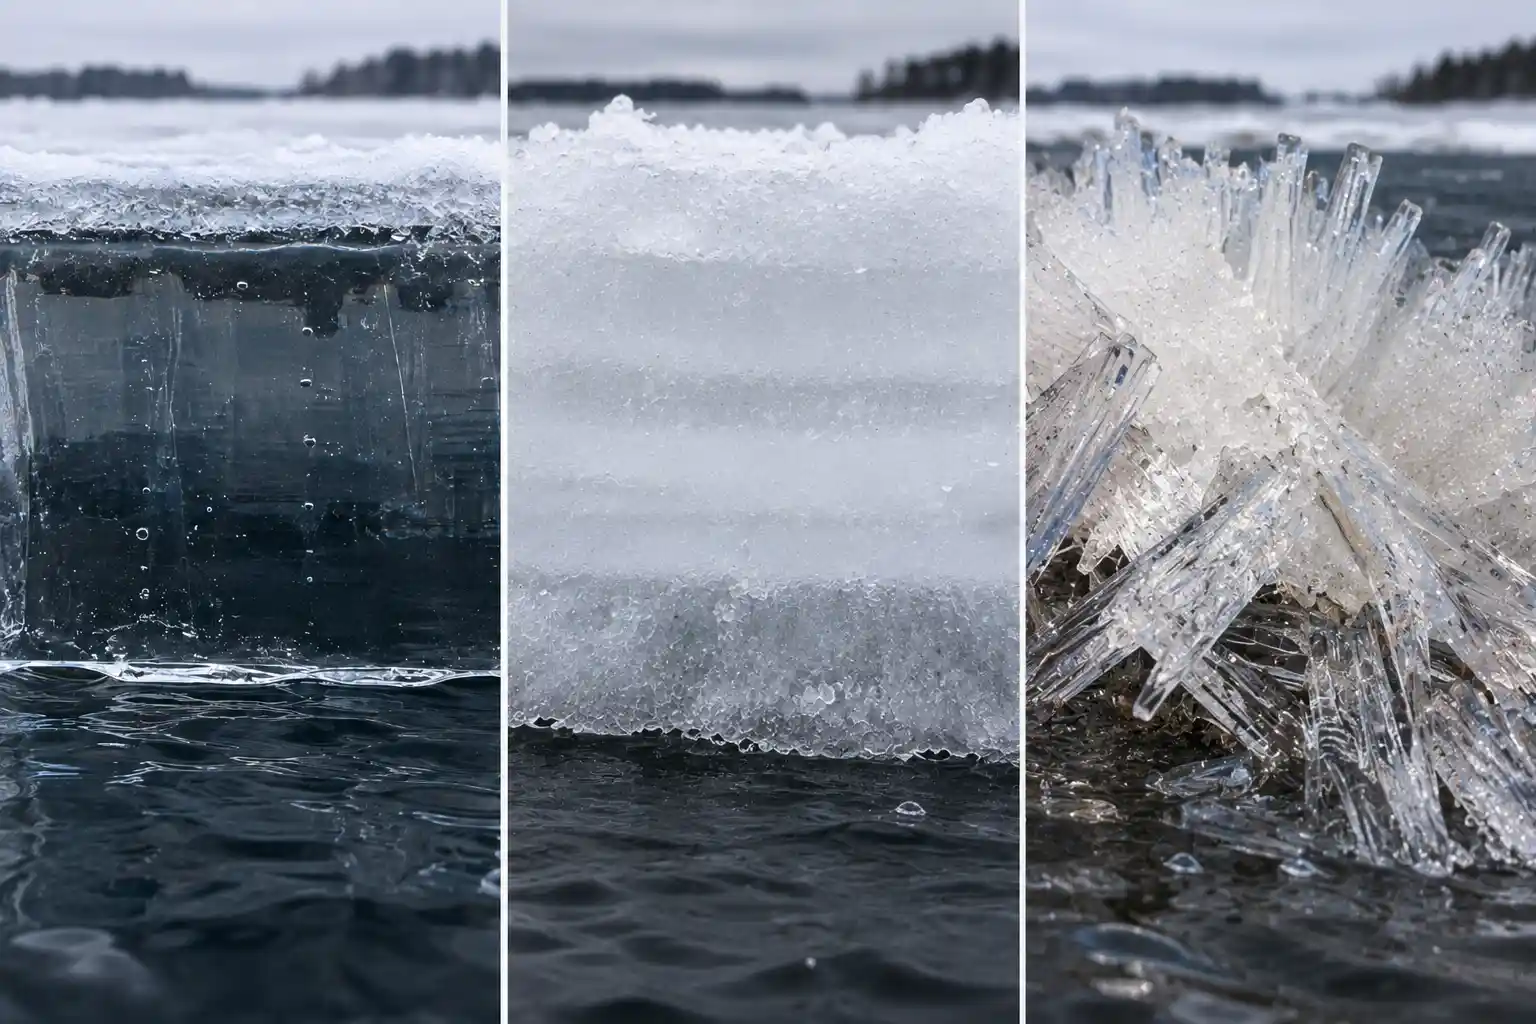
- Black or blue ice is new, clear ice formed directly from freezing lake water with relatively little trapped air. It is generally the strongest natural ice at a given thickness and is the type assumed by the Minnesota DNR thickness chart.
- White or opaque ice, often called snow ice, can form when water-soaked snow or slush freezes on top of existing lake ice. Its trapped air makes it weaker than new, clear ice. The Minnesota DNR states that white ice is approximately half as strong and advises doubling its standard thickness guidelines when traveling over it.
- Gray, dark, or honeycombed ice is a warning sign. Gray coloring can indicate water within or beneath deteriorating ice, while honeycombing shows that the internal structure is breaking down. Do not treat additional thickness as compensation for visibly deteriorated ice.
Early-winter ice and late-season ice can have the same measured thickness while possessing completely different internal structures. During spring thaw, sunlight and warm temperatures weaken the bonds between ice crystals, eventually creating vertical, candle-like columns that can break apart under relatively little load.
We’ve encountered honeycombed ice measuring around 6 inches that broke apart more like wet cardboard than solid early-season ice. When an auger or spud bar reveals soft, saturated, deteriorating ice instead of a solid structure, we retreat rather than trying to justify the reading on the tape.
Color, appearance, and drilling resistance are warning indicators—not substitutes for measurement. Evaluate them together with measured thickness, recent weather, local reports, moving water, snow cover, and repeated checks along your route.
What Weakens Ice
A thickness reading from one hole tells you about that hole—nothing more. Several conditions can weaken ice locally while the rest of a lake stays solid, and knowing what to watch for matters as much as the number on your auger flights.
- Moving water—river mouths, inlets, outlets, narrows, and underwater springs can prevent ice from forming or thickening consistently, even when the surrounding lake looks uniform.
- Aerators and bubblers—these systems circulate water and may create open water or dangerously thin ice beyond the area that is immediately visible.
- Docks, dark rocks, and other structures—dark materials can absorb sunlight, while structures and shoreline features can interfere with uniform freezing and create localized weak spots.
- Sudden temperature swings and rain—thaw-and-refreeze cycles can weaken existing ice and create layered ice that looks solid from above but does not behave like one uniform sheet.
- Decaying vegetation—plant decay and shallow weed growth can contribute to inconsistent ice formation in the same areas that often attract pike.
The Blind Spot Near Reeds and Submerged Timber
During our early-season checks, we’ve repeatedly encountered 5 to 6 inches of solid black ice in open areas and less than 2 inches near timber or reed lines only a short walk away. That is particularly important for pike anglers because shallow vegetation and submerged cover are often exactly where we want to place a bait.
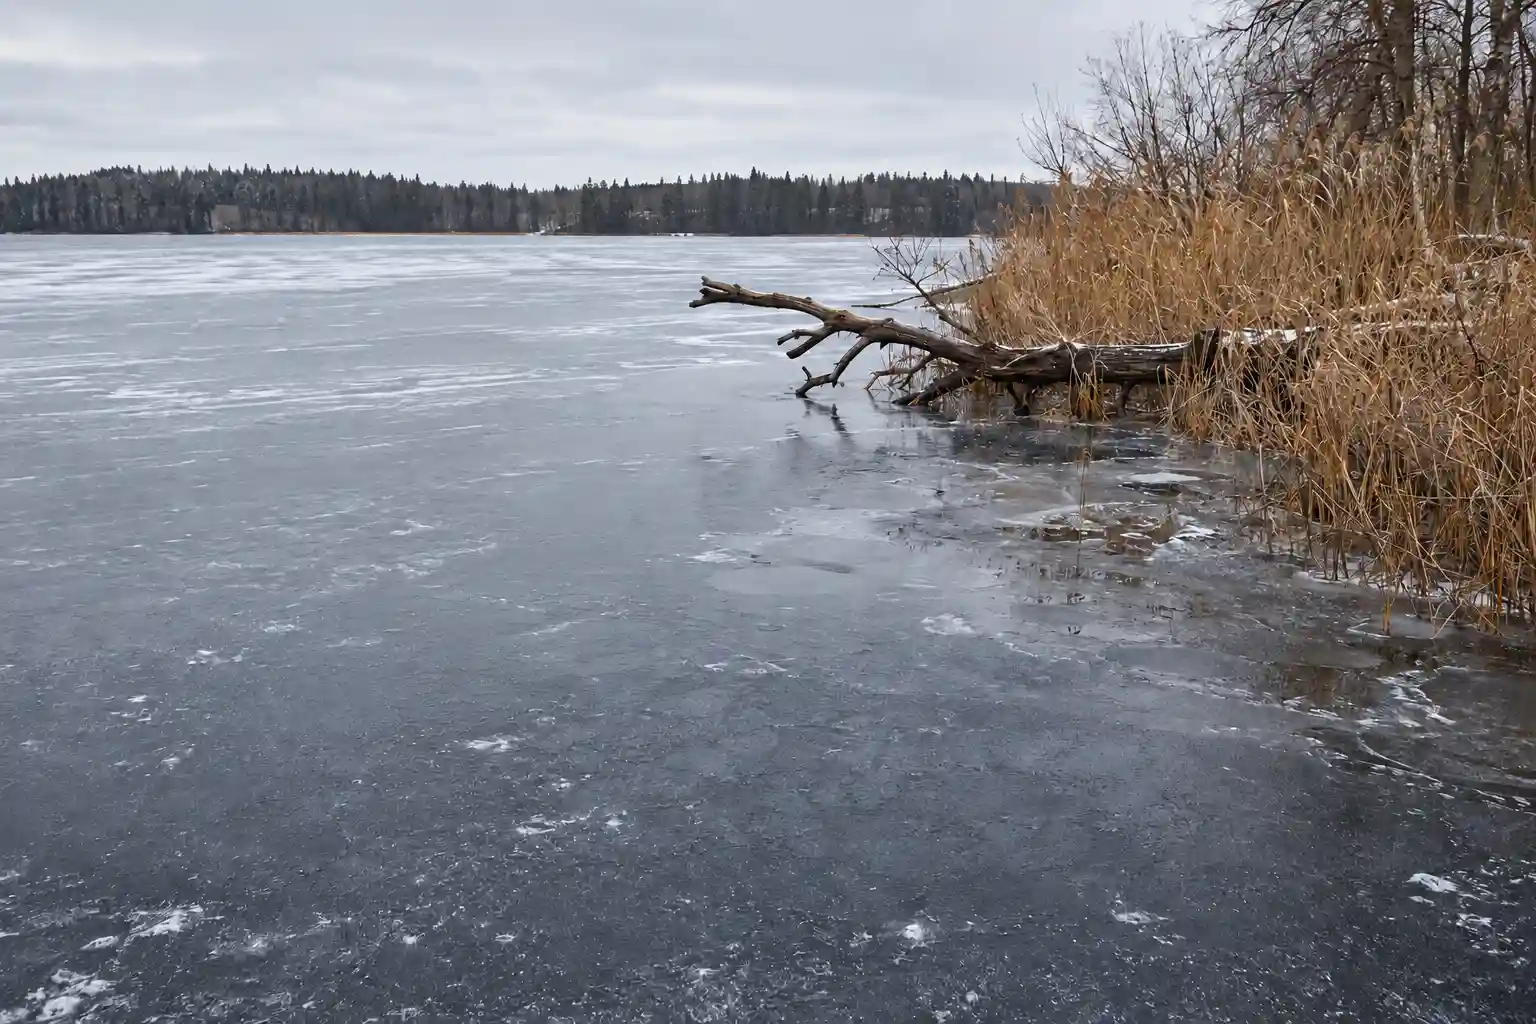
Vegetation, dark timber, trapped air, decaying plant material, and localized water movement can all interfere with uniform ice formation. A measurement taken in nearby open water should never be treated as proof that the ice beside the cover is equally strong.
In our own routine, we begin with a buffer of at least 10 to 15 feet from exposed cover or a timber line rather than walking directly toward it. That distance is our personal precaution, not a guarantee. We take new readings as we approach and turn back if we cannot verify consistent conditions between our previous position and the intended fishing spot.
The Snow Insulation Trap
A heavy blanket of snow can look peaceful, but in our experience it is one of the more hazardous conditions we encounter. Snow insulates the ice from cold air, slowing further growth even when air temperatures remain below freezing.
Its weight can also depress the ice and force water upward through cracks. That water may saturate the snow, create a concealed slush layer, and eventually refreeze into weaker white or layered ice.
Whenever we encounter heavy snow cover, we check much more frequently and deliberately reduce the load we are willing to place on the ice. Snow-covered ice is never a place to assume that guidelines for exposed, new clear ice still apply unchanged.
How to Actually Check the Ice
A reading near the access point confirms conditions only at that hole—not 100 yards farther out. Checking properly means beginning at shore and continuing to test and measure as you travel.
- Begin checking before committing your full weight. Shoreline ice can be weakened by runoff, changing water levels, rocks, docks, and repeated access. Use a spud bar from a stable position and make your first thickness measurement as close to shore as conditions safely allow.
- Use a spud bar or ice chisel to test ahead of your steps. Strike the ice in front of you before moving your weight forward. If the chisel penetrates unexpectedly, the resistance changes noticeably, or you encounter water or visibly deteriorated ice, stop and return along the route you already checked.
- Drill and measure additional holes as you move. Ice thickness is rarely uniform across a lake. The Minnesota DNR advises stopping frequently to check as you go, and we check even more often near cover, moving water, pressure ridges, snow-covered areas, and any visible change in the surface.
- Measure with a tape or marked measuring tool—not by eye. After drilling a test hole, use an ice-thickness gauge, marked ruler, or tape with a hooked end to measure from the underside of the ice to its surface. If the ice is visibly layered, slushy, or deteriorated, do not treat the total depth as equivalent to the same thickness of solid clear ice.
- Pay attention while drilling, but don’t use drilling feel as your final test. Changes in resistance, soft layers, trapped slush, or deteriorated ice can reveal a problem that deserves closer inspection. However, an auger normally loses resistance when it breaks through the bottom of the ice, and water entering a completed hole is expected. Confirm the structure and thickness directly instead of judging it only by the auger or the chips it produces.
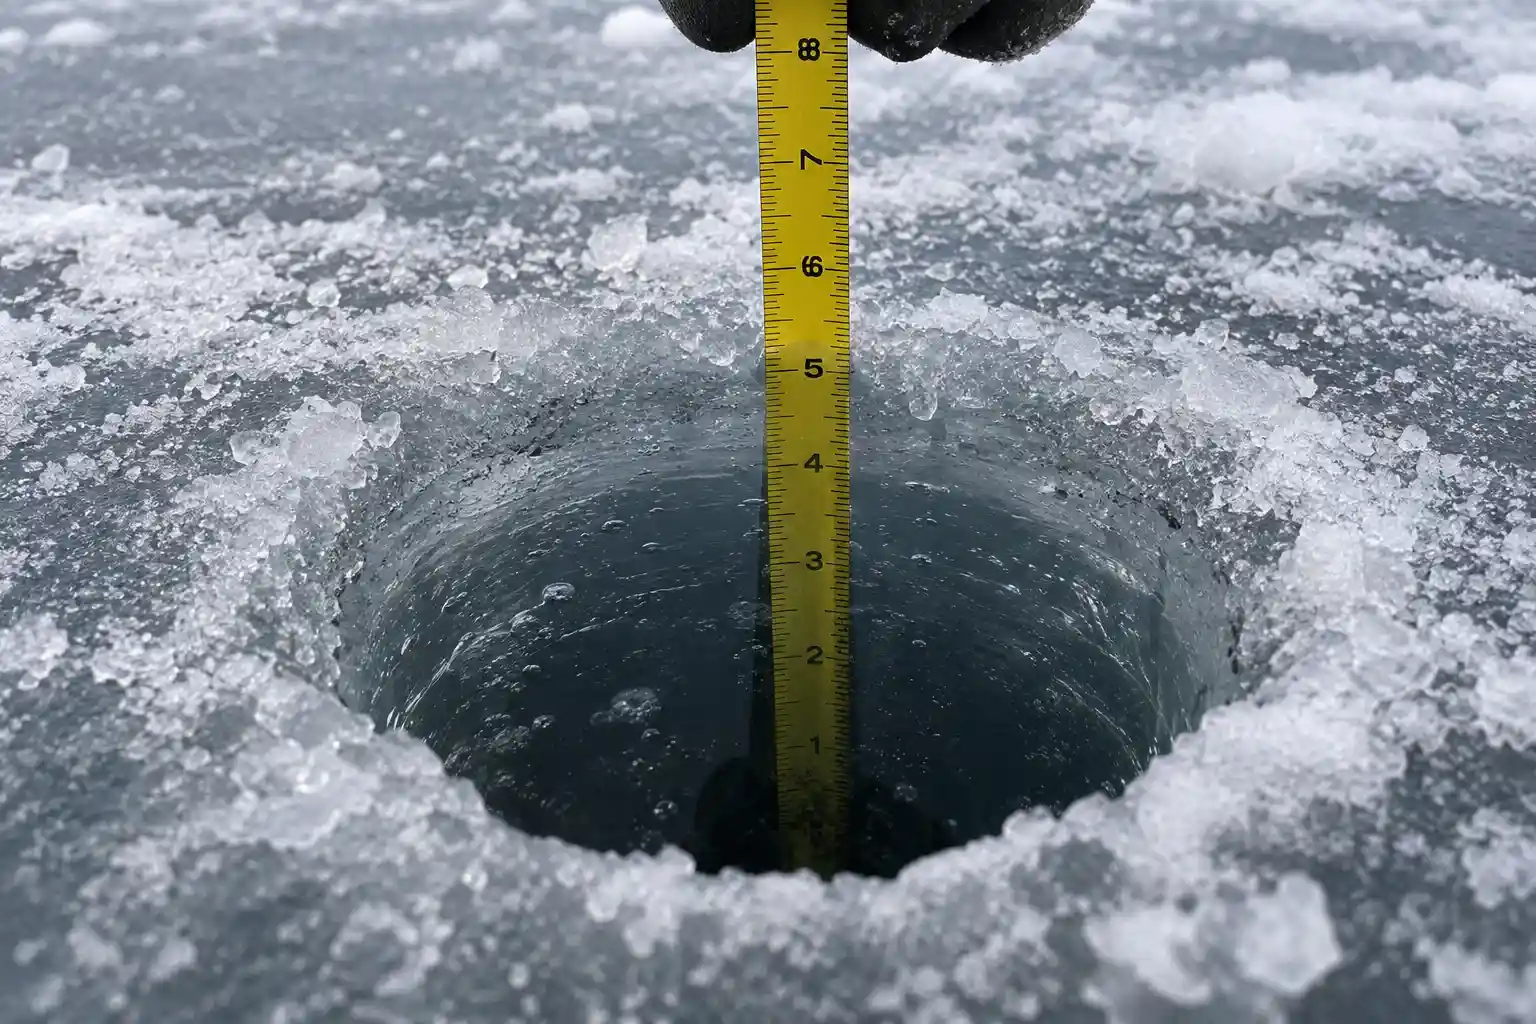
A spud bar is an early-warning tool, not a substitute for repeated measurements. It can help identify an abrupt change before your next step, but it cannot assign a reliable thickness to the entire route.
Avoid checking unfamiliar ice alone. Travel with a partner when possible, keep space between each person, and tell someone on shore where you’re going and when you expect to return. If snow, rain, warming temperatures, or changing water levels alter the conditions, treat earlier reports and previous measurements as outdated and check again.
Essential Ice Fishing Safety Gear
The right equipment cannot make weak ice safe, but it can improve your chances of avoiding a breakthrough, getting yourself out, or helping someone else. These are the items that earn a place in our setup rather than existing only on a checklist.
Ice Picks—Worn, Not Packed Away
One mistake we repeatedly see while anglers are setting up is self-rescue picks stored inside a zipped jacket pocket or buried in a gear bag. That makes them difficult—or impossible—to reach when they are needed.
Cold-water shock can disrupt breathing immediately after a breakthrough. As exposure continues, grip strength and fine motor control can deteriorate rapidly, making it increasingly difficult to open a zipper, search a bag, or hold the edge of the ice.
Our rule at MFG is non-negotiable: the picks stay on the angler, not in the sled. We wear them high on the chest over the outer layer, with both handles exposed and reachable without searching for them.
A Spud Bar or Ice Chisel
A spud bar gives us a way to test the surface ahead before committing the next step. It is especially valuable during early and late ice, near snow-covered transitions, and when approaching the shallow vegetation or timber that often holds pike.
It is an early-warning tool, not a thickness gauge. We still drill and measure regularly rather than assuming that a solid strike confirms the entire route.
An Accessible Throw Rope
We carry a 50- to 100-foot throw rope in a bag designed to be thrown accurately. It stays secured at the top of the sled or on a person where it can be reached immediately—not buried beneath the shelter and tackle.
A Life Jacket or Flotation-Assist Suit
A properly fitted, approved life jacket and flotation-assist ice clothing are not automatically the same thing. A certified PFD is tested and labeled for its intended use, while many floating ice suits provide additional buoyancy without carrying the same approval or performance claims.
Flotation can help a person remain nearer the surface and reduce the effort required after a breakthrough, but it cannot make unsafe ice safe. Check the exact certification and instructions for the garment you wear.
See our guide to floating ice fishing suits, or compare our tested jackets and bibs separately.
Ice Cleats and Reliable Footwear
Glare ice, wet surfaces, and refrozen slush can turn an ordinary walk into a serious fall before you reach the fishing spot. Cleats improve traction, but they do not reveal whether the ice beneath them is strong enough to support you.
Our ice cleats and traction guide explains which designs hold up across different surface conditions.
A Way to Call and Signal for Help
Carry a charged phone in a waterproof pouch on your body, not loose in the sled. In areas without reliable cellular coverage, consider a satellite communicator or personal locator beacon and understand how to activate it before the trip.
A whistle also deserves a fixed place on the outer layer. It can attract attention with less effort than repeatedly shouting, particularly when cold exposure begins affecting breathing and coordination.
Dry Clothing in a Waterproof Bag
We keep a complete change of dry clothing sealed in a waterproof bag. It stays protected in the sled because it is intended for use after an immersion, while emergency equipment needed in the water remains attached to the angler or immediately accessible.
Decide where every emergency item will live before stepping onto the ice. Equipment that cannot be reached with cold, shaking hands should be treated as unavailable.
Safety Inside an Ice Fishing Shelter
A shelter protects you from wind and cold, but it introduces risks of its own. Fuel-burning heaters can produce carbon monoxide, an odorless gas that may cause headache, dizziness, weakness, confusion, nausea, and loss of consciousness.
Use only equipment approved for the intended space, follow the manufacturer’s clearance and ventilation instructions, and keep vents unobstructed. Never assume that a partially opened door provides adequate ventilation, and do not sleep in a heated shelter unless the equipment is specifically designed and approved for that use.
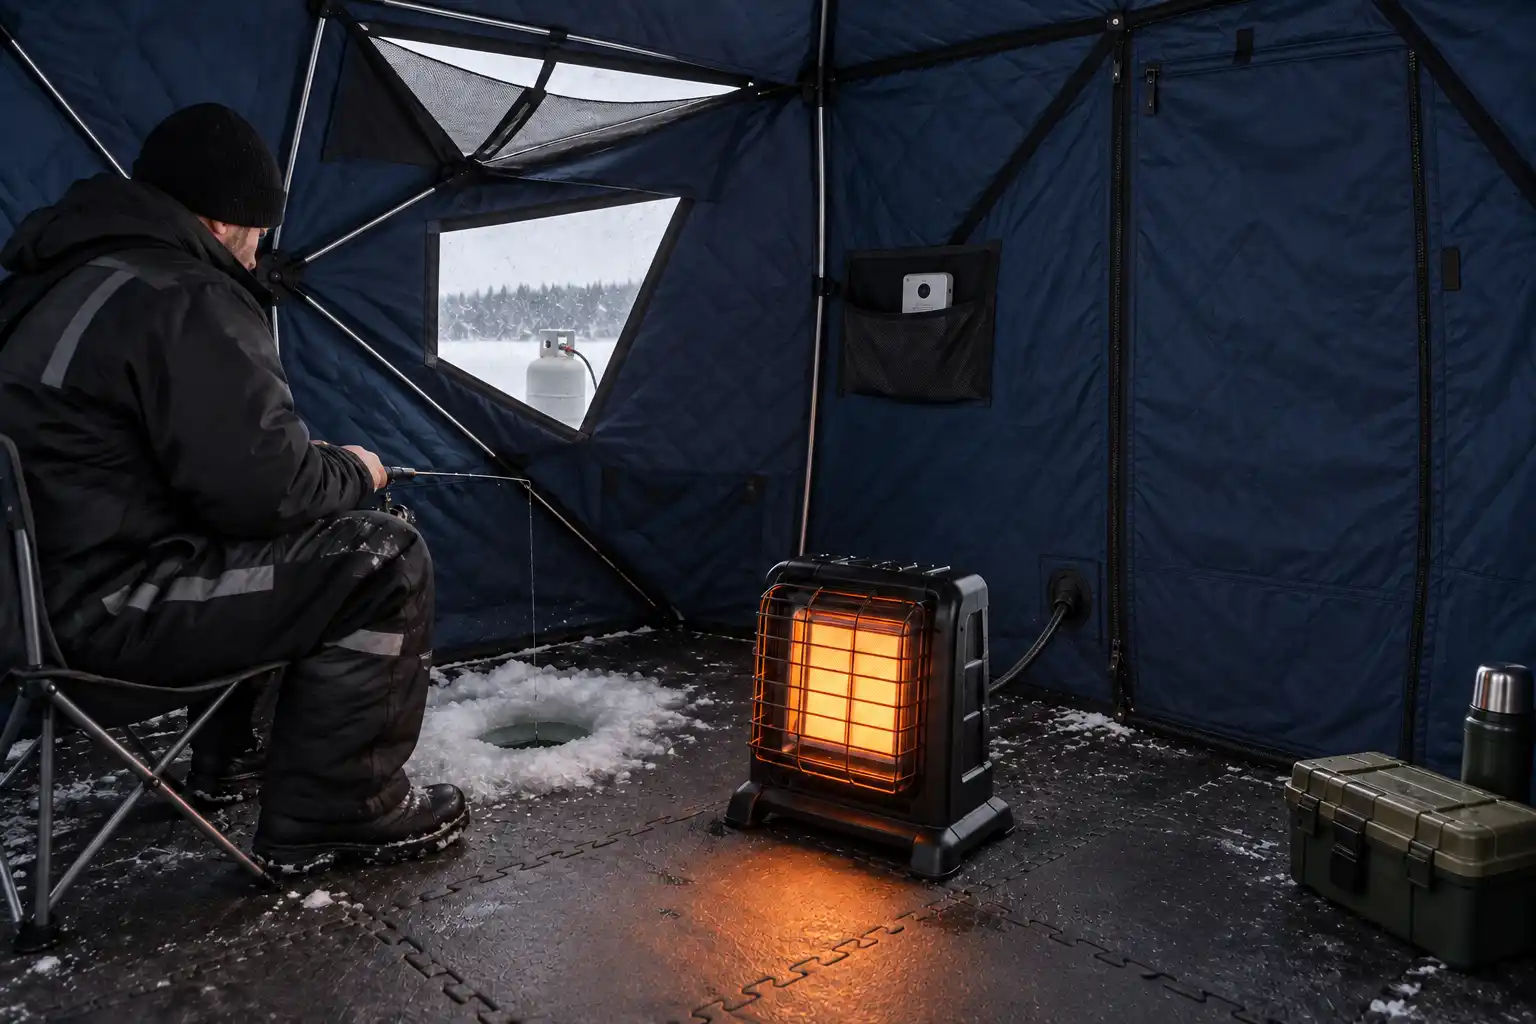
Keep combustible clothing, tackle, and shelter fabric away from the heater. If anyone develops unexplained headache, dizziness, nausea, or confusion, turn the heater off if this can be done safely, move everyone into fresh air, and contact emergency services.
If You Fall Through: Self-Rescue Step by Step
A fall through the ice is immediately life-threatening, but knowing the correct sequence can improve your chance of getting out. Cold-water reactions vary with water temperature, clothing, physical condition, flotation, and the circumstances of the fall. Do not rely on a fixed survival countdown—act immediately while concentrating first on keeping your airway above water.
What Cold Water Does First
- Cold shock begins immediately. An involuntary gasp, rapid breathing, and panic can cause you to inhale water. Keep your mouth above the surface and concentrate on slowing your breathing before making uncontrolled attempts to climb out.
- Useful movement can deteriorate quickly. Cold water progressively reduces grip strength, coordination, and the ability to use your arms and legs. The rate differs between people, so begin self-rescue as soon as your breathing is controlled.
- Hypothermia remains a threat during and after immersion. There is no universal one-hour onset point. Wet clothing, wind, air temperature, time in the water, and delays in reaching shelter all affect how quickly the body cools.
Field observation from supervised cold-water immersion: During controlled immersion drills with safety officers, the reaction that surprised us most was not simply the cold—it was the involuntary gasp and immediate loss of normal breathing control.
That experience changed the way we think about the first moments after a breakthrough. Trying to climb out while gasping and breathing uncontrollably increases the risk of inhaling water and wastes energy before you can coordinate your movements.
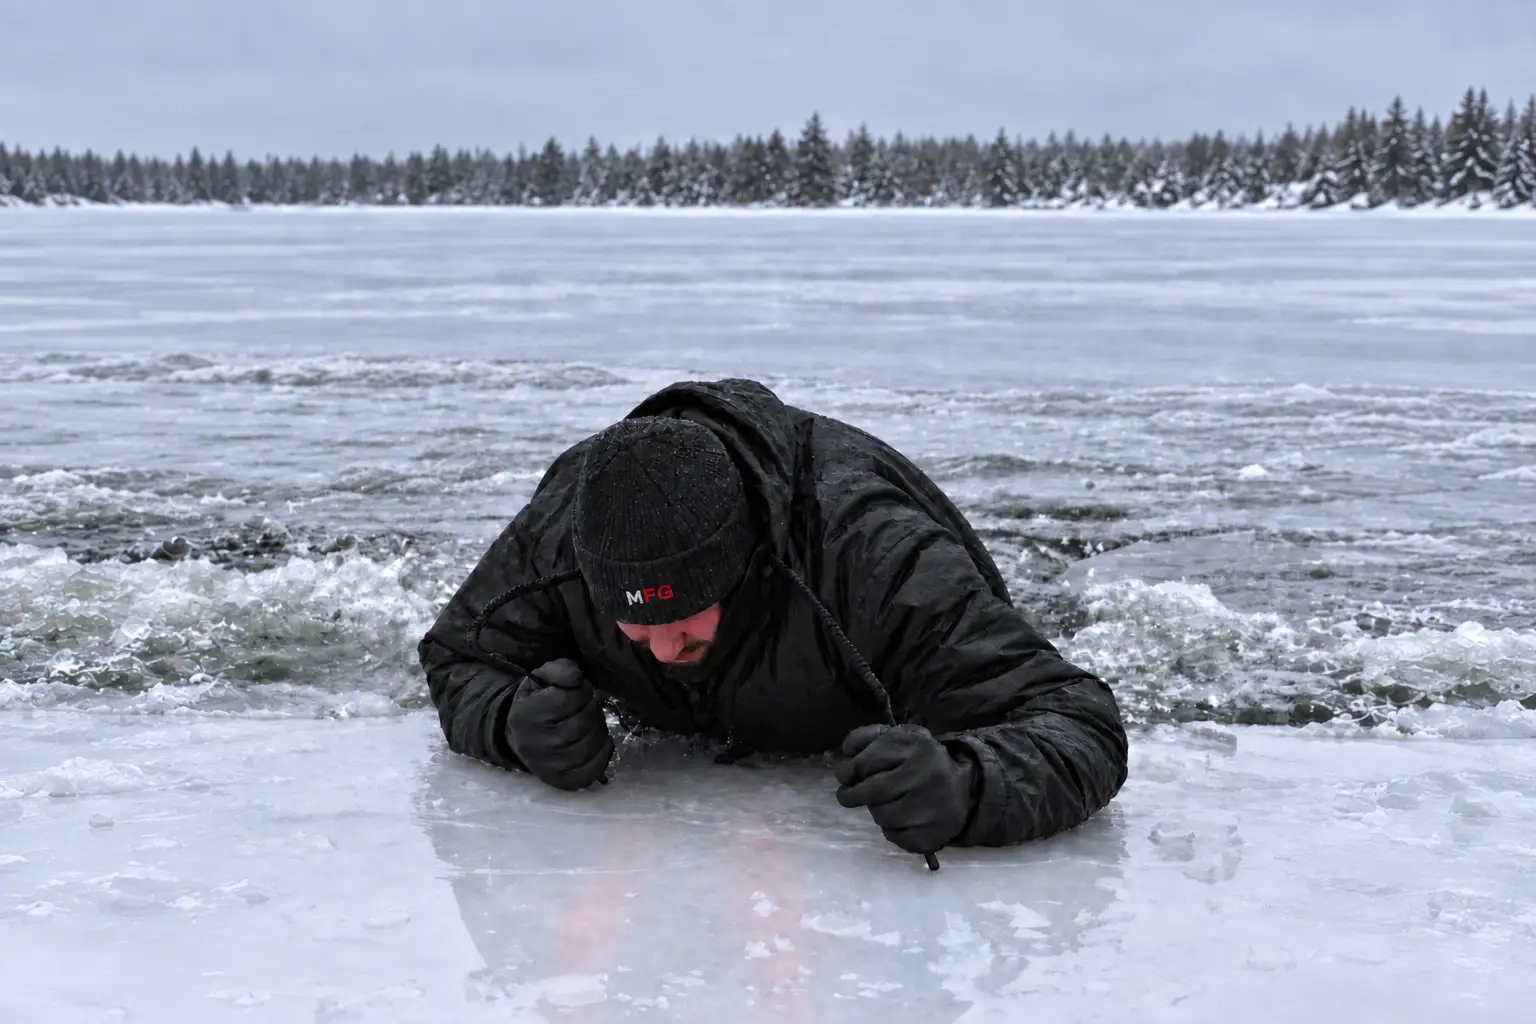
Our priority is to keep the airway above the surface, use flotation or the ice edge for support, and concentrate on slowing the breathing. Once we can breathe deliberately and coordinate our arms and legs, we turn toward the direction we came from and begin using the picks.
Once you can control your breathing, follow this sequence:
- Keep your winter clothing on. Do not waste time attempting to undress in the water. Clothing can retain some trapped air initially, while a properly fitted PFD or flotation-assist suit may provide additional buoyancy. Waterlogged clothing can restrict movement, so focus on getting horizontal rather than trying to climb vertically.
- Turn toward the direction you came from. That is the ice that supported you immediately before the breakthrough and is generally your best route back.
- Place your forearms on the unbroken surface. Spread them apart to distribute your weight and keep your upper body as horizontal as possible.
- Use your ice picks. Drive them into the surface to gain traction. This is why the picks must already be accessible on your chest rather than stored in a pocket or sled.
- Kick your legs while pulling forward. Use a strong swimming motion to raise your body horizontally onto the ice instead of attempting to pull yourself straight upward with your arms.
- If waterlogged clothing makes the final movement difficult, pause with your upper body supported on the ice. Allow some water to drain before continuing, provided the edge remains stable and you can keep your airway clear.
- Once out, do not stand. Remain flat and roll away from the opening toward the direction you came from. Continue crawling or rolling until you are well clear of the weakened area.
- Call for help and get to shelter. Return along the checked route, protect yourself from wind, and replace wet clothing with dry layers as soon as you can do so in a protected location.
Do not treat getting out of the water as the end of the emergency. Continued cooling, impaired judgment, confusion, loss of coordination, uncontrollable shivering, slurred speech, or unusual drowsiness require urgent medical attention.
Contact emergency services after a serious cold-water immersion, particularly if symptoms are present or the person cannot warm safely.
If Someone Else Falls Through: Preach, Reach, Throw, Row, Go
Watching someone break through the ice creates an immediate urge to run toward the opening—resist it. The ice around the victim has already failed, and approaching it upright can turn one person in the water into two.
Call 911 or the appropriate local emergency number immediately. Put the phone on speaker if possible so you can continue communicating with the victim while following the dispatcher’s instructions.
In our field safety briefings, we emphasize that running toward failed ice can create a second victim. We stop, assess the distance and available equipment, and choose the lowest-risk option first. If the person can be reached safely, we lie flat to distribute our weight and extend a spud bar, strong branch, ladder, or similar object. If they are farther away, we remain back and throw the rescue rope rather than moving closer simply to shorten the throw.
The Minnesota DNR organizes ice rescue around five steps. Follow them in order, moving to the next only when the previous option cannot be performed safely.
- Preach. Talk to the person from a safer position. Tell them that help is coming, encourage them to control their breathing, and direct them to turn toward the ice they came from. Clear instructions can reduce panic and help them begin self-rescue.
- Reach. If you can assist without entering the weak area, lie down to distribute your weight and extend a ladder, pole, branch, spud bar, or another long object. Do not stand at the edge or allow yourself to be pulled toward the opening.
- Throw. Throw a rescue rope, throw bag, ring buoy, life jacket, or another buoyant object from a secure position. Tell the victim to place a loop over their arms and around the upper body if the equipment allows. Do not depend on cold hands being able to tie a knot.
- Row. If a suitable light boat is available, it may provide a platform for reaching the victim while spreading the load. This is an advanced option and should follow emergency-dispatch instructions whenever possible. A normal fishing sled should not be treated as a rescue boat.
- Go. Direct entry into the water or onto the failed ice should be left to trained rescuers with proper equipment. An untrained person entering after the victim risks becoming another person who must be rescued.
Do not delay the emergency call while trying the first rescue method. If you cannot help without entering the failed area, remain back, maintain communication with the person, identify their location for responders, and continue looking for something that can be safely reached or thrown.
Once the person is out, keep them flat while moving away from the opening. Get them into shelter, replace wet clothing with dry layers, and follow the instructions of emergency medical personnel.
No chart, tool, or previous trip can guarantee that today’s ice is safe. Check current local conditions, measure repeatedly, carry rescue equipment where you can reach it, and turn back whenever the evidence is inconsistent. Missing one day of ice fishing is always the better outcome than forcing a trip onto conditions you cannot verify.
Ice Fishing Safety FAQ
How thick should ice be for ice fishing?
The Minnesota DNR lists 4 inches (10 cm) of new, clear ice as its general minimum for ice fishing or other activities on foot. That number is a reference point, not a guarantee. Ice quality, snow, current, recent weather, and local guidance must also be considered, and thickness should be checked repeatedly as you move.
Is 3 inches of ice safe for fishing?
No. Under the Minnesota DNR guidelines used in this article, you should remain off new, clear ice measuring less than 4 inches. Three inches also leaves little margin for thinner areas that may exist between measurement points.
Is 6 inches of ice enough for ice fishing?
Six inches of solid, new clear ice exceeds the general 4-inch on-foot guideline, but thickness alone cannot confirm that an area is safe. The Minnesota DNR separately lists 6 inches of effective thickness for one person as a stationary load lasting longer than two hours. Ice quality, total gear weight, local variation, and current conditions still matter.
How often should you check ice thickness while fishing?
The Minnesota DNR advises checking frequently as you travel. We check more often near shore, vegetation, timber, snow-covered transitions, pressure ridges, inlets, outlets, and anywhere the surface or drilling resistance changes.
Is white ice safe for ice fishing?
White or snow ice is weaker than new, clear ice. The Minnesota DNR describes it as approximately half as strong and advises doubling its standard thickness figures when traveling on it. Mixed, layered, thaw-weakened, gray, or honeycombed ice requires additional caution and may be unsuitable regardless of total thickness.
What safety gear do you need for ice fishing?
Essential ice fishing safety gear includes accessible ice picks, a spud bar or ice chisel, a throw rope, a properly fitted PFD or appropriate flotation-assist outerwear, ice cleats, a charged waterproof phone or satellite communicator, a whistle, and dry clothing stored in a waterproof bag.
Is it safe to go ice fishing alone?
Traveling with a partner is safer than ice fishing alone because someone is available to call for help or begin a shore-based rescue. If you still choose to go alone, leave a detailed route and return time with someone on shore, carry communication and self-rescue equipment on your body, and avoid unfamiliar or uncertain ice.
Does a floating ice fishing suit replace a life jacket?
Not automatically. Many floating ice fishing suits provide flotation assistance but are not certified PFDs. Check the labeling and approval status of the specific garment rather than assuming that every product marketed as a floating suit meets life-jacket requirements.